Imagine running Facebook ads without knowing if they’re working. Sounds like a shot in the dark, right? That’s where Facebook Pixel comes in! It’s a powerful tool that helps you track and optimize your ads, ensuring you get the best return on investment (ROI). If you’re wondering how to set up Facebook Pixel effortlessly, you’re in the right place. In this blog, we’ll walk you through the process in just five simple steps.
Table of Content:
What is Facebook Pixel?
Before jumping into the setup process, let’s first understand what is Facebook Pixel. Simply put, it’s a piece of code that you install on your website to track user interactions. This data helps you measure ad performance, retarget visitors, and create lookalike audiences for better conversions.
How Does Facebook Pixel Work?
Facebook Pixel works by placing and triggering cookies that track users when they interact with your website. It collects data on page views, button clicks, form submissions, and purchases. This information is then sent back to Facebook, allowing advertisers to:
- Analyze customer behavior to refine targeting.
- Create custom audiences based on site visitors.
- Measure ad performance and optimize campaigns.
- Retarget potential customers who engaged but didn’t convert.
5 Simple Steps of Facebook Pixel Set Up-
Step 1: Create a Facebook Pixel
The first step is creating your Facebook Pixel inside Meta Events Manager. Here’s how:
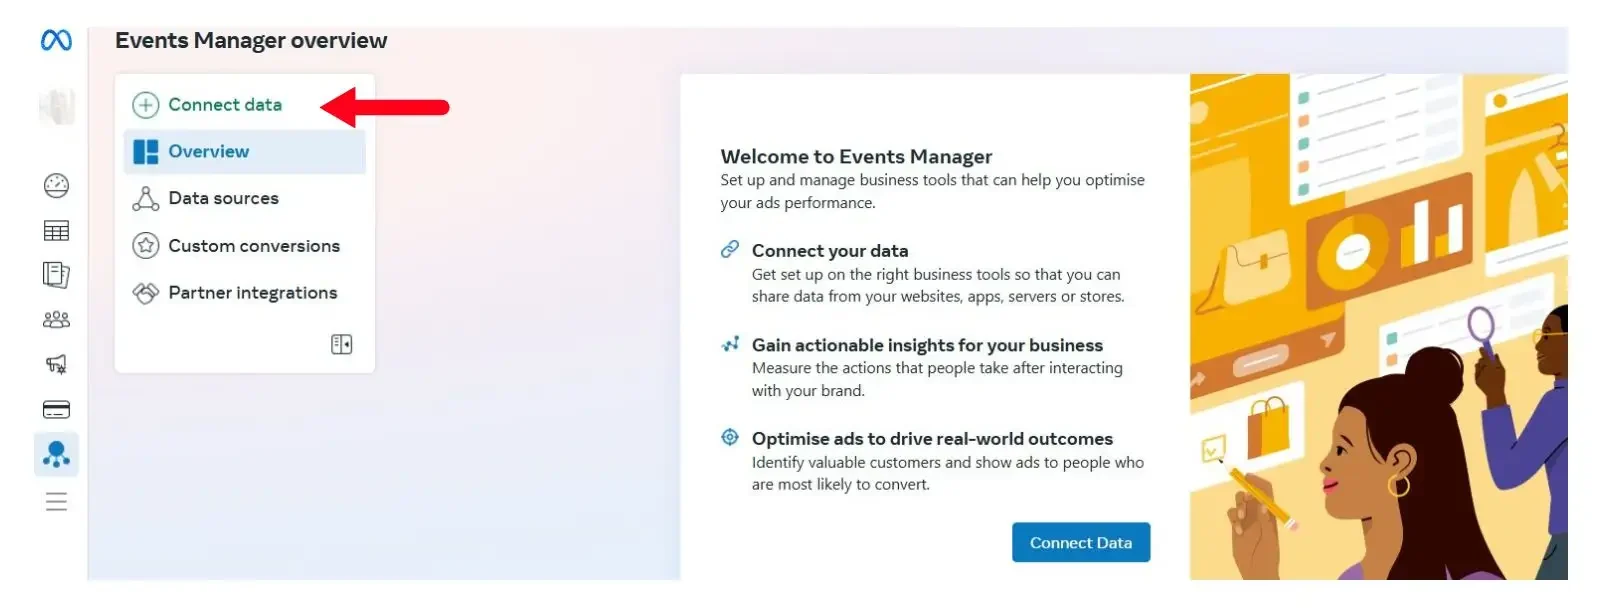
- Go to Meta Events Manager.
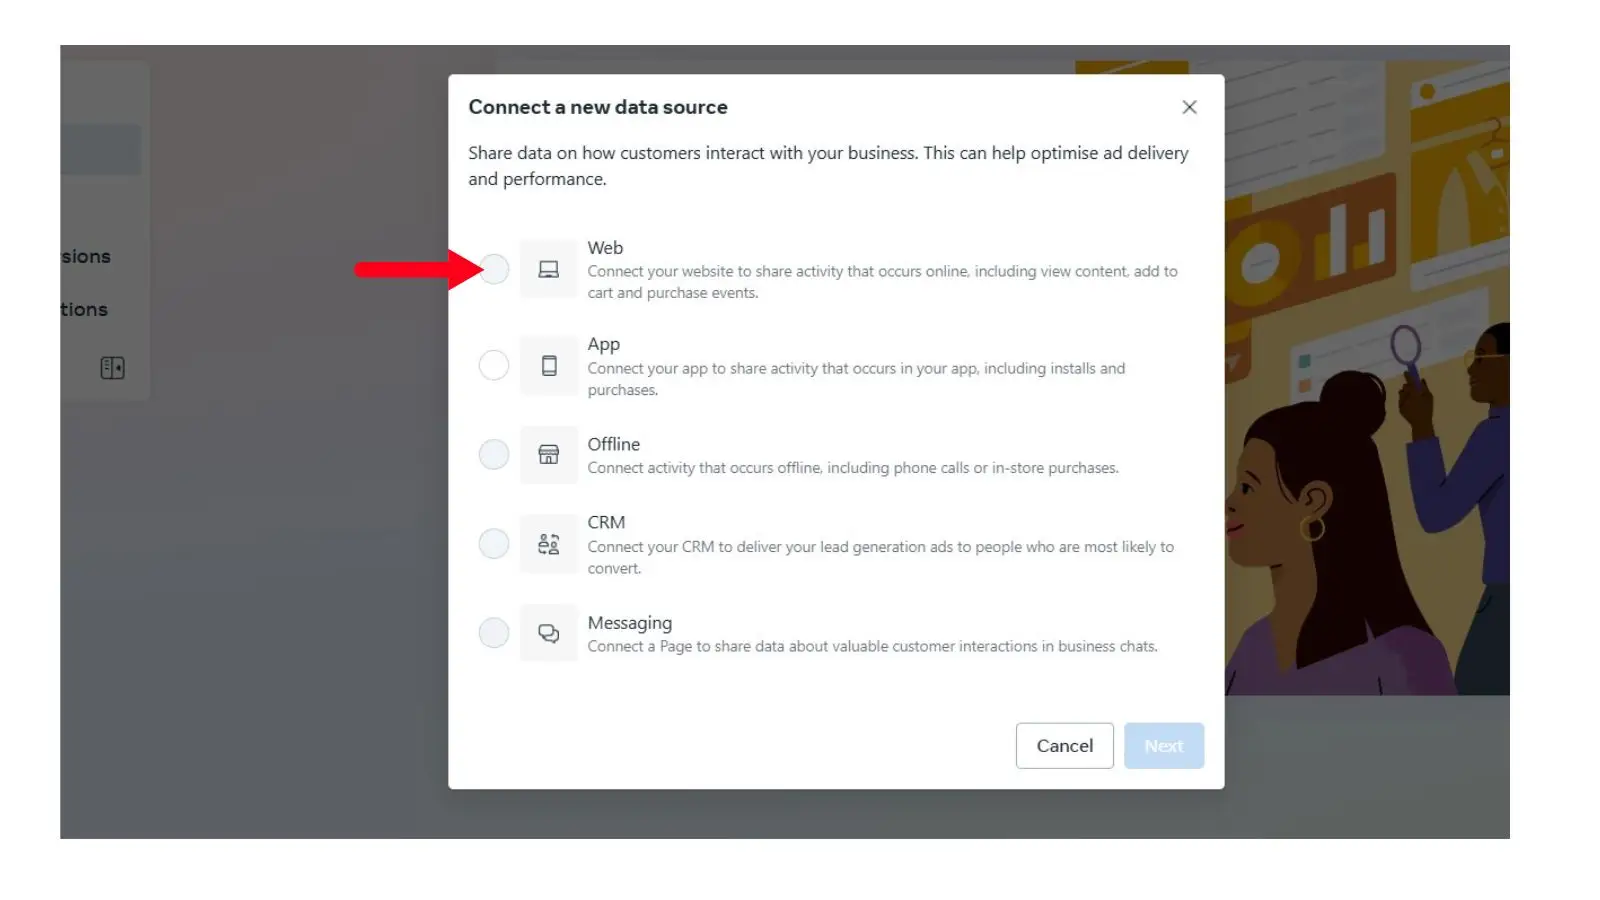
- Click “Connect Data” and select “Web” as your data source.


3. Choose “Meta Pixel” and hit “Connect”.
4. Name your Pixel and enter your website URL, then click “Continue”.
Once you’ve created your Pixel, Facebook will generate a unique Pixel ID for tracking purposes. This ID is crucial for linking your website to Meta’s tracking system.
Understanding Pixel Data Sharing
Facebook provides three levels of data sharing:
- Conservative Matching: Collects minimal user data.
- Enhanced Matching: Collects email or phone numbers for better tracking.
- Maximum Matching: Uses advanced data collection to maximize tracking efficiency.
Select the one that best suits your privacy and tracking needs before proceeding with installation.
Pro Tip: Name your Pixel based on your business name for easy identification.
Step 2: Add the Pixel to Your Website
Now that you have your Pixel, it’s time to install it on your website. You can do this in two ways:
Option 1: Using a Partner Integration (Recommended for Shopify, Wix, WordPress)
- If your website is on Shopify, Wix, or WordPress, Facebook provides an easy integration.
- Select your platform and follow the step-by-step instructions for seamless installation.
- Log into your website builder and navigate to the Facebook Pixel Integration section.
- Enter your Pixel ID and connect your account.
- Facebook will automatically insert the necessary code and start tracking events.
Option 2: Manual Installation
- Copy the pixel code provided in Meta Events Manager.
- Install and Activate the Plugin WP Headers & Footers
- Click Settings → WP Headers & Footers.
- Paste your code in header script.
- Save and publish the changes.
Testing the Pixel Installation
- Open your website in a new browser tab.
- Right-click and select View Page Source or use browser developer tools.
- Search for fbq(‘init’, ‘your-pixel-id’) to confirm the pixel is added.
⚠️ Important: Ensure the pixel is placed in the <head> section on all pages for accurate tracking.
Step 3: Verify Your Pixel Installation
To make sure your Pixel is working correctly, use the Facebook Pixel Helper.
How to Use Facebook Pixel Helper?
- Install the Meta Pixel Helper Chrome Extension.
- Visit your website and click on the Pixel Helper icon in your browser.
- If your Pixel is installed correctly, the icon will turn blue and display the number of active pixels.
- Click on the Pixel Helper icon to view details about each pixel event.
- Look for any warnings or errors. If something is wrong, follow the troubleshooting suggestions.
Common Pixel Installation Issues and Fixes
- Pixel not found? Double-check that you installed the code correctly in the <head> section.
- Multiple Pixels detected? Ensure you’re not running duplicate pixels on the same page.
- No events firing? Visit your website and perform an action (like clicking a button) to test events.
If you see errors, double-check your installation or refresh the page.
Step 4: Set Up Events for Tracking
Facebook Pixel isn’t just about tracking visits; it helps you track actions (events) on your site.
How to Set Up Events?
- In Meta Events Manager, select your Pixel.
- Click “Add Events” → “From the Pixel”.
- Use the Event Setup Tool to track specific actions (e.g., purchases, sign-ups, button clicks).
Types of Events You Can Track
Facebook allows you to track different types of events, including:
- Standard Events: Predefined actions such as Add to Cart, Purchase, Lead, Complete Registration.
- Custom Events: Unique interactions that are specific to your business needs.
Setting Up Standard Events
- Click on Manage Integrations inside Meta Events Manager.
- Select Event Setup Tool and enter your website URL.
- Follow the prompts to track standard events (like purchases or form submissions).
Setting Up Custom Events (For Advanced Tracking)
If you need more detailed insights, custom events help track unique user actions:
- Define your event parameters (e.g., tracking clicks on a specific CTA button).
- Add custom event code snippets inside your website’s HTML or via Google Tag Manager.
- Test the event using Facebook Pixel Helper to ensure proper tracking.
Tip: Proper event tracking allows Facebook to optimize your ads for better conversion rates.
Step 5: Confirm Data Reception in Events Manager
Once everything is set up, you need to ensure that your Pixel is successfully collecting data. Follow these steps:
- Go to Meta Events Manager – Navigate to your Pixel Overview section.
- Monitor Activity – Look for incoming events, such as Page Views, Add to Cart, or Purchases.
- Check the Diagnostics Tab – Identify any issues with event tracking and follow Facebook’s troubleshooting suggestions.
- Use Test Events Tool – This tool allows you to simulate user activity on your site and see if the events are firing correctly.
- Adjust Your Ad Strategy – Based on the insights, optimize your targeting, bidding, and ad creatives to improve performance.
If your Pixel isn’t tracking, try clearing your browser cache, ensuring the code is placed correctly, and testing again.
What is Facebook Pixel Helper?
The Facebook Pixel Helper is a free Chrome extension designed to help advertisers verify and troubleshoot their Facebook Pixel installation. It detects Pixel implementation errors and provides insights into event tracking.
Why Use Facebook Pixel Helper?
- Instantly detect if your Pixel is firing correctly.
- See which events are being tracked in real time.
- Identify and fix setup errors before launching ads.
- Ensure proper data flow to optimize ad performance.
Why is Facebook Pixel Important?
- Tracks Conversions: Know how many users take action on your website after clicking your ad.
- Optimizes Ads: Facebook’s AI uses pixel data to show ads to the right audience.
- Enables Retargeting: Reach users who visited your site but didn’t convert.
- Builds Lookalike Audiences: Find new users similar to your existing customers.
- Improves ROAS (Return on Ad Spend): Helps ensure you’re spending your ad budget efficiently.
FAQs
Conclusion
Setting up Facebook Pixel might seem technical, but following these five simple steps makes it easy. Once installed, you’ll unlock valuable insights, improve your ad targeting, and increase your conversions. Facebook’s powerful AI will use your pixel data to deliver ads to the right people, helping you maximize your return on ad spend (ROAS).
By leveraging event tracking, you can fine-tune your campaigns and retarget potential customers more effectively. Whether you’re an eCommerce store owner, a service provider, or a blogger, the Facebook Pixel is a game-changer for digital advertising.
Got any questions about how to set up Facebook Pixel? Drop them in the comments below!


